How to Install a Food Disposer
If you are among the recent wave of environmentally-savvy homeowners who are considering installing a convenient food waste disposer, you are probably curious as to whether there is a lot of work involved for proper installation. The short answer is: sort-of. For a homeowner with intermediate (note, we didn't say beginning level) level of plumbing skills, however, the task is not inconceivable. But if you are all thumbs when it comes to plumbing, you may be best-suited to leave this one to a pro. Let's look at how a food disposer is installed so that you can decide for yourself if you are up to the job.
You should be aware that unless you are replacing an existing food disposer with a newer model, you will need to install a switch and run electrical power to the disposer. If you are confident in your ability to wire the disposer's switch yourself and have familiarity with local fire and safety codes, then you can do this part of the project yourself. If you are unsure how to do the wiring, it is always best to contract an electrician to do this for you - it's a rather simple job and shouldn't be that expensive. Either way, getting the proper wiring lined up is money well-spent to avoid any problems on down the road. A full size drain opening is also needed for use with a food disposer. |
 |
|
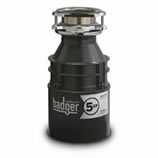
Insinkerator Badger 5xp Disposer
|
The food disposer should be wired to its own circuit if possible. Some homeowners elect to wire the disposer to the dishwasher's circuit - so the choice is yours. If you do the wiring yourself, follow these important tips to ensure your safety and the safety of your home.
- Always turn the power off when working with electricity and lock the electrical panel box to make sure that no one turns the power back on by mistake while you are installing your food disposer. Test the wires to be certain that the power is off in your work area.
- Check with local building authorities to ascertain whether or not your need a permit for the wiring work.
- Have a knowledgeable inspector come out to inspect your handiwork prior to turning the power back on.
- Wear a dust mast and eye goggles for your personal safety.
- You will need the following tools and materials for a do-it-yourself installation of a food disposer: Phillips screwdriver, straight screwdriver, pliers, pipe wrench and other wrenches, hose clamp, wire nuts, hack saw, goggles, plumber's putty, and (of course) the disposer unit and related accessories that are packaged with it.
You can purchase some of your plumbing tools right here at Faucet Depot.com:
These directions are to be followed with the assumption that you have a traditional sink with two bowls. First, remove the drain lines that connect the two sink bowls. Decide which bowl you wish to attach the food disposer to and remove the strainer from that bowl, including the strainer's body from the rim. You will see that you now have an empty hole in the sink bowl that you want to attach the disposer to.
Using plumber's putty, form a thick snake-like roll of putty (using your hands like you would if playing with Play-Dough). Firmly press this plumber's putty roll to the base of the food disposer's flange (this will be included with the food disposer). Next, place the food disposer's flange (putty side down) in the drain hole. Press it firmly to secure it.
Install the food disposer flange's upper mounting rings, lower mounting rings, and gasket. Snap the retaining ring in place and tighten the screws on the mounting rings until the flange seems to be securely in place. You should see most of your plumber's putty roll being squeezed from around the disposer's flange while doing this; trim the excess putty away with a knife. Now it is just a simple matter of attaching the disposer unit to the flange that you have installed by following the manufacturer's instruction that are included in the food disposer packaging. Depending on the manufacturer and the model of food disposer that you purchase, you will attach the disposer using bolts or a mounting ring.
You're almost done! Your disposer kit will have a gasket or a washer in the packaging that is used to attach the discharge tubing to the discharge opening that is located on the side of the disposer. Knock out the dishwasher nipple plug if you plan to attach the dishwasher to the disposer and clamp the discharge tubing for the dishwasher to the dishwasher nipple. Drain lines can now be installed and both bowls of your double bowl sink can be routed together. You will need to use a "p trap" and a "t" fitting.
|