Easy Faucet Installation Guide – You CAN Do-It-Yourself!
Feeling the pinch of the economy? Save big by doing your own faucet installation. Calling out the local plumber might be your easiest course of action, but it certainly won't be the cheapest option you have. Installing a kitchen faucet or bathroom faucet is a straightforward process that doesn't require complex plumbing skills in order to achieve great, professional looking results. This easy faucet installation guide will have you feeling like a master plumber in no time (and wondering why you didn't do-it-yourself all along).
Removing Your Old Faucet
Before attempting to remove the old faucet, you will need to turn the water supply to the faucet off using a shut off valve that is located underneath the sink or elsewhere. You will then need to disconnect the supply lines that are connected to your faucet. Removing the existing faucet that you have in the kitchen or bath may be the hardest part of your faucet installation. Difficulty in removal may arise from connections and hardware on the existing faucet being corroded, which makes them hard to break loose.
For difficult to remove faucets, you might need a basin wrench and channel lock pliers. The basin wrench will allow you to reach up from behind the sink to loosen the nuts that are holding your faucet in position and may have become corroded. In severe cases of corrosion, penetrating oil may become necessary. Once you have loosened nuts and removed any mounting hardware, you can remove the faucet. Clean up the sink surface and the area where the old faucet was mounted before moving on to installation of your new faucet. (Believe it or not, you're halfway done)!
Installing Your New Faucet
Most new faucets come pre-packaged with a gasket; however, there are exceptions. If your new faucet does not come packaged with a gasket, you will need to purchase a container of high quality, good grade plumber's putty or caulking. Apply caulking between the faucet's bottom and the counter or sink top where it is being installed. A word of caution: if you are installing the faucet on a fiberglass or marble sink or countertop, do not use plumber's putty; choose a caulk that is made specifically for these surfaces instead. If your faucet came packaged with a gasket, you will need to place the gasket on the faucet's bottom and mount the faucet on the counter or sink top through the provided holes. You can also put small beads of putty or caulk around the base of the faucet to help hold it into place. Most faucets are secured in place with nuts that can tightened easily by hand; however, if the faucet you are installing does not have the type of nuts that can be tightened in this fashion, you can use a basin wrench of adjustable pliers to tighten them. Depending upon the type of faucet that you install (single handle, double handle, single-hole, single lever, etc) and the manufacturer of the faucet, there are various different methods of mounting the faucet - so be sure to read the manufacturer's instructions that are included in the faucet's package.
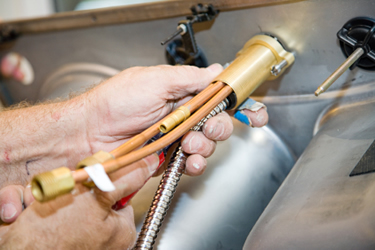
Once your new faucet is installed, your next step will be to re-connect the water supply to the cold and hot connections on the new faucet. At this point, many homeowners choose to replace the existing supply lines or other plumbing beneath the sink. You may also need to replace these lines if they are an incorrect length. If you decide to replace the plumbing lines to the new faucet, be certain to purchase the right types of connections for the shut off valve and the faucet (most faucets use a ½" supply line). Of special note: if you are using copper tubing or copper supply lines to connect your faucet, now is the best time to replace the washers on these connecting parts.
Once the supply lines are re-connected, you can turn the water back on at the shut off valve. Remove the aerator (temporarily) located in the faucet's spout to allow debris or other sediment left over from the manufacturing process to be expelled from the faucet. Turn the faucet's tap on and run for a minute or so to inspect for leaks in the faucet and in the connecting supply lines. Once this is complete and you have cleaned up excess putty or caulk (a damp rag usually does the trick), you can stand back and admire your independent spirit and newfound plumbing skills. You did it! Your new faucet is installed and ready for use, and your wallet is glad that you did it yourself.
|
|